Just found this post from Yenka today, apparently you can create your casing in Google SketchUp, then export them to Yenka.
http://www.yenka.com/blogs/leaderintechnology/entry/new_yenka_simulations_3d_pcb
Saturday, February 20, 2010
Friday, February 19, 2010
Creating a Cloud
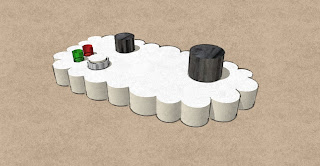
Designing a cloud shaped 3 dimensional object in Google SketchUp, using a sketch of the actual shape and adding additional features.
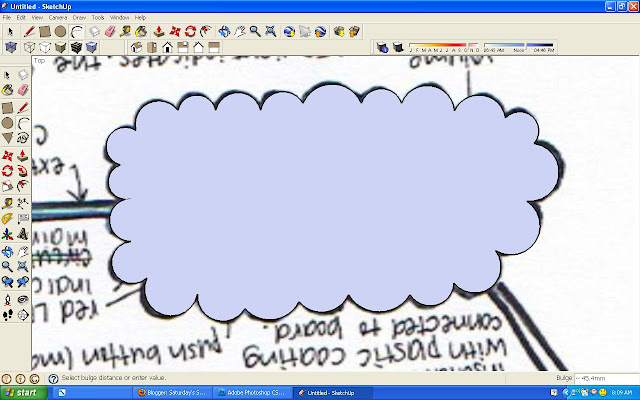
First open Google Sketchup and create a new file, select the top view in Views, and in the File menu select Import and import the .jpeg you are going to trace over place it carefully on the top view plane. and Lock on the ORIGIN
Magnify and enlarge your view to make it easier to trace around.
First try using the Free hand tool and trace over the sketch of the final design. When you have completed the trace of your object it should fill in as a grey object. Using the Hide menu to hide the .jpeg sketch (Edit menu) to check your shape.You may continue to work with this shape, but there is a more accurate way is to draw using the Arc tool.
The Arc tool is harder to manipulate, as the arcs do not always stay on the same plane when you are drawing them. The most import thing is to make sure that each arc you create is on the Endpoint of the previous arc. when you have finished the cloud use the Hide menu to hide the .jpeg sketch (Edit menu) to check your shape.
Unhide the background and hide the cloud you have created.
Using the Circle tool add in the features - buttons, you will get a dialogue box telling you you are creating shapes which intersect with a hidden object, just carry on as it is OK this is exactly what you want.
Finally Hide your .jpeg sketch and unhide the cloud.
Using the Extrude tool:
- the cloud is going to be extruded +25mm
- the 2 small LEDs -6mm
- the push button -5mm
- the volume control -2mm
- the timer control -10mm
If your sketch is in proportion but not to scale, then use the extrude tool an do by eye, this is still acceptable for the final 3 dimensional drawings, and even your orthographic views, add the dimensions on using another software.
Because we added shapes to the same plane you will notice the underside has holes. this can be overcome, but for this tutorial this will be ok.
So the orthographic views Exported as 2D Graphic and assembled using Photoshop. Notice I have altered the background by selecting the Hidden Line option and hiding all guides and axis. and moving away from the object enogh to limit the distortion.
Final orthographic views (BBC Bitesize)
If you want to group the cloud, select the whole cloud and save as a Group in the Edit. To Ungroup the cloud use Explode.
Final views of the "cloud controller", with and without shadows, and stylized using Assorted Styles (personally my favorite), then exported as 2d Graphics
With time this model could be refined, adding text, using components already created in the Google 3D Warehouse for example the LEDs.
Another way to create this cloud outline more accurately is to traceit using a vector drawing software such as Adobe Illustrator, or Xara, or download Serif DrawPlus and for US $9.99 you have an export to CAD features:
Saturday, February 13, 2010
First Steps - A Lego brick
This tutorial is to help you start using Google SketchUp - Google provide a fantastic set of tutorials and there are many more YouTube videos. Check them out:
http://sketchup.google.com/training/videos.html
Modelling you first single Lego brick using Google SketchUp through to adding dimensions,views, producing orthographic views, colour, stylized sketches through to final designs.
When you open Google SketchUp Select Product Design and Woodworking in Millimeters, then Start using SketchUp.
This is the main screen, showing the axis you are going to work on, and additional menu items have been opened which you will need, they can be found in the Views then Toolbars menu, check the following menus:
Creating the base using the rectangle tool (hover over the tools and their name will appear), draw a square, to get the correct dimensions, type in:
When you hover over an object it will become highlighted with blue dots, this indicates that this face has been selected.
Using the extrude tool, pull up the selected face, then type in:
To create the interlocking pin of the logo brick, draw a circle on the top face of the brick, then type in the radius:
Extrude the cylinder to the height of:
Using the text tool, type the word LEGO,
By adding shadows you can make your model look more dynamic
Colour
You can select to remove the black line edges, in the Views menu
Example of a multi-coloured Lego brick
Taking images from Google SketchUp:
Remember to arrange your images correctly, making sure that the views line up correctly, as above, add any dimensions that are missing, give your orthographic drawing a title, scale, and finally add that the drawings were created using Google SketchUp.
Initial Designs Ideas Using Google SketchUp
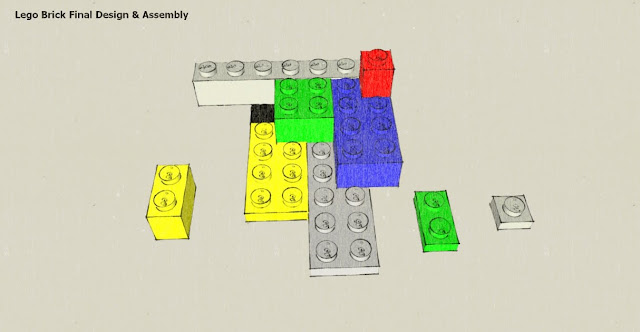
You can create all you initial designs in Google SketchUp, colour, stylize and annotate them, you can create each model individually, then assemble on one sheet in Google SketchUp, or export them and assemble them into one image using an another software. See examples below.
When you make new models it is a good idea to group them or make them into components, it will make moving them much easier. Select All then using Make Group or Make Component from the Edit menu
Examples of initial design sheets which have been created completely in Google SketchUp.
Removing the cast shadows
Stylized Examples, there are loads of different styles to suit your 3D model, you can even mix them together! Here are 7 different styles just to give you an idea how you might present your ideas.
And finally a simple final design straight from Google SketchUp, just remove the axis and the colour background.
Just in case you want to know a little more about Lego here are two links:
http://sketchup.google.com/training/videos.html
Modelling you first single Lego brick using Google SketchUp through to adding dimensions,views, producing orthographic views, colour, stylized sketches through to final designs.
When you open Google SketchUp Select Product Design and Woodworking in Millimeters, then Start using SketchUp.
This is the main screen, showing the axis you are going to work on, and additional menu items have been opened which you will need, they can be found in the Views then Toolbars menu, check the following menus:
- Large Tool Set
- Views
- Face Styles
- Shadows
Creating the base using the rectangle tool (hover over the tools and their name will appear), draw a square, to get the correct dimensions, type in:
- 80,80 and then hit Enter
You do not type the numbers into the box shown above, draw the box then type the numbers and they will appear in the box as you type, clicking enter will then re-size your square
When you hover over an object it will become highlighted with blue dots, this indicates that this face has been selected.
Using the extrude tool, pull up the selected face, then type in:
- 96 and then hit Enter
To create the interlocking pin of the logo brick, draw a circle on the top face of the brick, then type in the radius:
- 25, then hit Enter
Extrude the cylinder to the height of:
- 17, then hit Enter
Using the text tool, type the word LEGO,
- Use Script MT Bold
- Size: 15 by 2 mm high
Place centrally on top of the cylinder. You may have to resize it further using the resizing tool.
By adding shadows you can make your model look more dynamic
Colour
You can colour the whole brick with one colour, or a texture, or individual faces can be coloured separately:
- select the whole brick with the selection tool,
- select the paint bucket, choose a colour from the pallete
- touch the selected model
- In the Views menu, un-check the Axis option, to clear the image area for better screen shots.
You can select to remove the black line edges, in the Views menu
Example of a multi-coloured Lego brick
Taking images from Google SketchUp:
- Using Print Screen, and pasting into a paint software such as Gimp or Photoshop for further editing.
- Using the Export feature in the File menu, select 2D Graphic, save as a .jpeg or as a .png. Then paste into your project work.
For your D&T portfolio you will need to create orthographic views of your final design, that is a plan, side and front elevation with dimension and scale and whether it is first or third angle projection.
Taken from http://www.foothillsgraphics.com/ortho.htm
Starting with the Top view add dimensions using the dimensioning tool to your model, export the image as a 2D graphic, then remove the dimensions using the Eraser, switch the views to a Side view, add the appropriate dimensions once again and export, repeat this once again for the Front view and export
Remember to arrange your images correctly, making sure that the views line up correctly, as above, add any dimensions that are missing, give your orthographic drawing a title, scale, and finally add that the drawings were created using Google SketchUp.
Initial Designs Ideas Using Google SketchUp
You can create all you initial designs in Google SketchUp, colour, stylize and annotate them, you can create each model individually, then assemble on one sheet in Google SketchUp, or export them and assemble them into one image using an another software. See examples below.
When you make new models it is a good idea to group them or make them into components, it will make moving them much easier. Select All then using Make Group or Make Component from the Edit menu
Examples of initial design sheets which have been created completely in Google SketchUp.
Removing the cast shadows
Stylized Examples, there are loads of different styles to suit your 3D model, you can even mix them together! Here are 7 different styles just to give you an idea how you might present your ideas.
Final Design Sheets
This sheet should include a main perspective / isometric view of your final design, with annotation and colour. You may wish to show it from different view point, in that case use one main view and arrange smaller images
onto the sheet. keep the stylization the same for all images used on one sheet.
And finally a simple final design straight from Google SketchUp, just remove the axis and the colour background.
Just in case you want to know a little more about Lego here are two links:
This tutorial has been adapted from a tutorial I used to teach at Mid-Cheshire College back in 1998, using the folowing software
- 3D Studio Max - http://usa.autodesk.com/
- Strata 3D - http://www.strata.com/
And if you want to create your own Lego projects you might want to use Lego's own 3d software, then you can send off for the model!
Subscribe to:
Comments (Atom)


